使用Data Binding Library实现双向绑定的详细教程
在Android开发中,Data Binding Library(数据绑定库)提供了一种简化UI和数据交互的方式。通过在编译时生成绑定类,开发者可以在XML布局文件中直接绑定UI组件和Kotlin代码中的字段或方法。以下是有关如何使用数据绑定库的详细介绍。
一、绑定表达式
1.1 什么是绑定表达式
绑定表达式是用于将UI元素与Kotlin代码中的字段或方法直接关联的表达式。在XML布局文件中,可以使用绑定表达式来动态设置UI组件的属性值。例如,可以将一个TextView的文本属性绑定到一个变量。
1.2 示例代码
以下是一个示例,展示了如何使用绑定表达式将TextView的text属性绑定到一个变量:
<TextView
    android:id="@+id/textView"   <!-- 设置TextView的ID -->
    android:layout_width="wrap_content"   <!-- 设置TextView的宽度为内容自适应 -->
    android:layout_height="wrap_content"   <!-- 设置TextView的高度为内容自适应 -->
    android:text="@{variablename.userName}" />   <!-- 绑定TextView的text属性到变量userName -->
二、双向绑定
2.1 什么是双向绑定
双向绑定是一种数据绑定模式,其中UI组件的变化会自动更新到数据模型,而数据模型的变化也会自动反映到UI组件上。例如,EditText组件可以与一个变量双向绑定,以便在用户输入内容时自动更新该变量。
2.2 示例代码
以下是一个示例,展示了如何使用双向绑定将EditText的text属性绑定到一个变量:
<EditText
    android:id="@+id/editText"   <!-- 设置EditText的ID -->
    android:layout_width="wrap_content"   <!-- 设置EditText的宽度为内容自适应 -->
    android:layout_height="wrap_content"   <!-- 设置EditText的高度为内容自适应 -->
    android:text="@={variablename.userInput}" />   <!-- 双向绑定EditText的text属性到变量userInput -->
三、实现示例
3.1 在build.gradle.kts中启用数据绑定
要在项目中启用数据绑定功能,需要在build.gradle.kts文件中配置:
android {
    buildFeatures {
        dataBinding = true   // 启用数据绑定功能
    }
}
3.2 activity_main.xml布局文件示例
在activity_main.xml中设置布局文件,并使用<layout>标签定义数据绑定:
<?xml version="1.0" encoding="utf-8"?>
<layout xmlns:android="http://schemas.android.com/apk/res/android"
    xmlns:app="http://schemas.android.com/apk/res-auto"
    xmlns:tools="http://schemas.android.com/tools">
    <FrameLayout
        android:id="@+id/HomeFrame"   <!-- 设置FrameLayout的ID -->
        android:layout_width="match_parent"   <!-- 设置FrameLayout的宽度为填充父布局 -->
        android:layout_height="match_parent"   <!-- 设置FrameLayout的高度为填充父布局 -->
        tools:context=".MainActivity">   <!-- 指定MainActivity作为上下文 -->
    </FrameLayout>
</layout>
3.3 MainActivity.kt文件示例
在MainActivity.kt中使用数据绑定初始化布局,并替换Fragment:
package com.example.databindingoneway

import androidx.appcompat.app.AppCompatActivity
import android.os.Bundle
import androidx.databinding.DataBindingUtil
import com.example.databindingoneway.databinding.ActivityMainBinding

class MainActivity : AppCompatActivity() {
    lateinit var binding: ActivityMainBinding   // 定义数据绑定对象

    override fun onCreate(savedInstanceState: Bundle?) {
        super.onCreate(savedInstanceState)
        binding = DataBindingUtil.setContentView(this, R.layout.activity_main)   // 初始化数据绑定
        supportFragmentManager.beginTransaction()
            .replace(R.id.HomeFrame, LoginFragment())   // 替换Fragment
            .commit()
    }
}
3.4 Profile.kt类示例
定义一个Profile数据类:
package com.example.databindingoneway

class Profile(var name: String = "", var pass: String = "")   // 定义Profile类,包含name和pass字段
3.5 fragment_login.xml布局文件示例
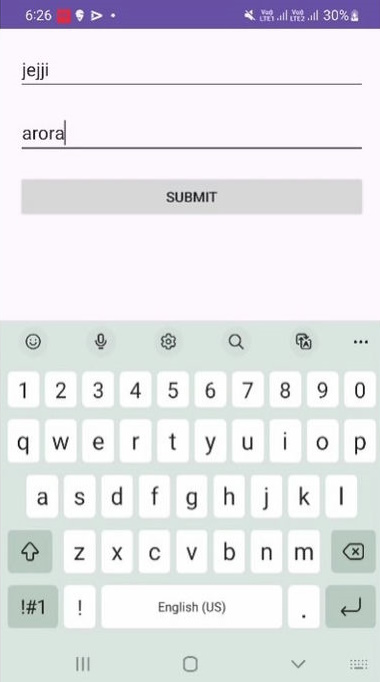
在fragment_login.xml中定义LoginFragment的布局,并使用双向绑定:
<?xml version="1.0" encoding="utf-8"?>
<layout xmlns:android="http://schemas.android.com/apk/res/android"
    xmlns:tools="http://schemas.android.com/tools"
    xmlns:app="http://schemas.android.com/apk/res-auto">
    <data>
        <variable
            name="data"   <!-- 定义数据变量 -->
            type="com.example.databindingoneway.Profile" />   <!-- 数据类型为Profile -->
    </data>
    <androidx.constraintlayout.widget.ConstraintLayout
        android:layout_width="match_parent"   <!-- 设置ConstraintLayout的宽度为填充父布局 -->
        android:layout_height="match_parent"   <!-- 设置ConstraintLayout的高度为填充父布局 -->
        tools:context=".LoginFragment">
        <androidx.appcompat.widget.AppCompatEditText
            android:id="@+id/nameET"   <!-- 设置EditText的ID -->
            android:layout_width="0dp"   <!-- 设置EditText的宽度为0dp,使用约束布局 -->
            android:layout_height="wrap_content"   <!-- 设置EditText的高度为内容自适应 -->
            android:layout_marginTop="20dp"   <!-- 设置EditText的上边距为20dp -->
            android:layout_marginHorizontal="20dp"   <!-- 设置EditText的左右边距为20dp -->
            android:hint="@string/enter_name"   <!-- 设置EditText的提示文本 -->
            android:text="@={data.name}"   <!-- 双向绑定EditText的text属性到数据变量name -->
            app:layout_constraintStart_toStartOf="parent"   <!-- 设置EditText的起始边与父布局对齐 -->
            app:layout_constraintTop_toTopOf="parent"   <!-- 设置EditText的顶部边与父布局对齐 -->
            app:layout_constraintEnd_toEndOf="parent" />   <!-- 设置EditText的结束边与父布局对齐 -->
        <androidx.appcompat.widget.AppCompatEditText
            android:id="@+id/passET"   <!-- 设置EditText的ID -->
            android:layout_width="0dp"   <!-- 设置EditText的宽度为0dp,使用约束布局 -->
            android:layout_height="wrap_content"   <!-- 设置EditText的高度为内容自适应 -->
            android:layout_marginTop="20dp"   <!-- 设置EditText的上边距为20dp -->
            android:layout_marginHorizontal="20dp"   <!-- 设置EditText的左右边距为20dp -->
            android:hint="@string/enter_password"   <!-- 设置EditText的提示文本 -->
            android:text="@={data.pass}"   <!-- 双向绑定EditText的text属性到数据变量pass -->
            app:layout_constraintStart_toStartOf="parent"   <!-- 设置EditText的起始边与父布局对齐 -->
            app:layout_constraintTop_toBottomOf="@id/nameET"   <!-- 设置EditText的顶部边与nameET底部对齐 -->
            app:layout_constraintEnd_toEndOf="parent" />   <!-- 设置EditText的结束边与父布局对齐 -->
        <androidx.appcompat.widget.AppCompatButton
            android:id="@+id/loginBTN"   <!-- 设置Button的ID -->
            android:layout_width="0dp"   <!-- 设置Button的宽度为0dp,使用约束布局 -->
            android:layout_height="wrap_content"   <!-- 设置Button的高度为内容自适应 -->
            android:text="@string/submit"   <!-- 设置Button的文本 -->
            android:layout_marginTop="20dp"   <!-- 设置Button的上边距为20dp -->
            android:layout_marginHorizontal="20dp"   <!-- 设置Button的左右边距为20dp -->
            app:layout_constraintStart_toStartOf="parent"   <!-- 设置Button的起始边与父布局对齐 -->
            app:layout_constraintTop_toBottomOf="@id/passET"   <!-- 设置Button的顶部边与passET底部对齐 -->
            app:layout_constraintEnd_toEndOf="parent" />   <!-- 设置Button的结束边与父布局对齐 -->
    </androidx.constraintlayout.widget.ConstraintLayout>
</layout>
3.6 LoginFragment.kt文件示例
在LoginFragment.kt中设置数据绑定并处理UI交互:
package com.example.databindingoneway

import android.os.Bundle
import androidx.fragment.app.Fragment
import android.view.LayoutInflater
import android.view.View
import android.view.ViewGroup
import com.example.databindingoneway.databinding.FragmentLoginBinding

class LoginFragment : Fragment() {
    private lateinit var binding: FragmentLoginBinding   // 定义数据绑定对象
    private val bundle = Bundle()   // 创建一个Bundle对象
    private val fragment = HomeFragment()   // 创建一个

HomeFragment对象
    val profile = Profile()   // 创建一个Profile对象

    override fun onCreateView(
        inflater: LayoutInflater, container: ViewGroup?,
        savedInstanceState: Bundle?
    ): View? {
        binding = FragmentLoginBinding.inflate(inflater, container, false)   // 初始化数据绑定
        return binding.root   // 返回根视图
    }

    override fun onViewCreated(view: View, savedInstanceState: Bundle?) {
        super.onViewCreated(view, savedInstanceState)
        initUI()   // 初始化UI
    }

    private fun initUI() {
        binding.data = profile   // 将Profile对象绑定到数据变量
        binding.loginBTN.setOnClickListener {
            bundle.apply {
                putString("name", profile.name)   // 将Profile的name字段存入Bundle
                putString("pass", profile.pass)   // 将Profile的pass字段存入Bundle
            }
            fragment.arguments = bundle   // 将Bundle传递给HomeFragment
            requireActivity().supportFragmentManager.beginTransaction()
                .replace(R.id.HomeFrame, fragment)   // 替换Fragment
                .addToBackStack(null)   // 添加到返回栈
                .commit()
        }
    }
}
3.7 fragment_home.xml布局文件示例
在fragment_home.xml中定义HomeFragment的布局,并绑定数据显示:
<?xml version="1.0" encoding="utf-8"?>
<layout xmlns:android="http://schemas.android.com/apk/res/android"
    xmlns:tools="http://schemas.android.com/tools"
    xmlns:app="http://schemas.android.com/apk/res-auto">
    <data>
        <variable
            name="data"   <!-- 定义数据变量 -->
            type="com.example.databindingoneway.Profile" />   <!-- 数据类型为Profile -->
    </data>
    <androidx.constraintlayout.widget.ConstraintLayout
        android:layout_width="match_parent"   <!-- 设置ConstraintLayout的宽度为填充父布局 -->
        android:layout_height="match_parent"   <!-- 设置ConstraintLayout的高度为填充父布局 -->
        tools:context=".HomeFragment">
        <androidx.appcompat.widget.AppCompatTextView
            android:id="@+id/nameTV"   <!-- 设置TextView的ID -->
            android:layout_width="wrap_content"   <!-- 设置TextView的宽度为内容自适应 -->
            android:layout_height="wrap_content"   <!-- 设置TextView的高度为内容自适应 -->
            android:layout_marginTop="20dp"   <!-- 设置TextView的上边距为20dp -->
            android:textSize="16sp"   <!-- 设置TextView的文本大小为16sp -->
            android:text="@{data.name}"   <!-- 绑定TextView的text属性到数据变量name -->
            app:layout_constraintStart_toStartOf="parent"   <!-- 设置TextView的起始边与父布局对齐 -->
            app:layout_constraintTop_toTopOf="parent"   <!-- 设置TextView的顶部边与父布局对齐 -->
            app:layout_constraintEnd_toEndOf="parent" />   <!-- 设置TextView的结束边与父布局对齐 -->
        <androidx.appcompat.widget.AppCompatTextView
            android:id="@+id/passTV"   <!-- 设置TextView的ID -->
            android:layout_width="wrap_content"   <!-- 设置TextView的宽度为内容自适应 -->
            android:layout_height="wrap_content"   <!-- 设置TextView的高度为内容自适应 -->
            android:layout_marginTop="20dp"   <!-- 设置TextView的上边距为20dp -->
            android:textSize="16sp"   <!-- 设置TextView的文本大小为16sp -->
            android:text="@{data.pass}"   <!-- 绑定TextView的text属性到数据变量pass -->
            app:layout_constraintStart_toStartOf="parent"   <!-- 设置TextView的起始边与父布局对齐 -->
            app:layout_constraintTop_toBottomOf="@id/nameTV"   <!-- 设置TextView的顶部边与nameTV底部对齐 -->
            app:layout_constraintEnd_toEndOf="parent" />   <!-- 设置TextView的结束边与父布局对齐 -->
    </androidx.constraintlayout.widget.ConstraintLayout>
</layout>
3.8 HomeFragment.kt文件示例
在HomeFragment.kt中获取传递的数据并显示:
package com.example.databindingoneway

import android.os.Bundle
import androidx.fragment.app.Fragment
import android.view.LayoutInflater
import android.view.View
import android.view.ViewGroup
import com.example.databindingoneway.databinding.FragmentHomeBinding

class HomeFragment : Fragment() {
    private lateinit var binding: FragmentHomeBinding   // 定义数据绑定对象
    private val profile = Profile()   // 创建一个Profile对象

    override fun onCreateView(
        inflater: LayoutInflater, container: ViewGroup?,
        savedInstanceState: Bundle?
    ): View? {
        binding = FragmentHomeBinding.inflate(inflater, container, false)   // 初始化数据绑定
        return binding.root   // 返回根视图
    }

    override fun onViewCreated(view: View, savedInstanceState: Bundle?) {
        super.onViewCreated(view, savedInstanceState)
        arguments?.let {
            profile.name = it.getString("name")!!   // 从Bundle中获取name并设置到Profile对象
            profile.pass = it.getString("pass")!!   // 从Bundle中获取pass并设置到Profile对象
        }
        binding.data = profile   // 将Profile对象绑定到数据变量
    }
}
通过上述代码和说明,你可以看到如何在Android项目中使用数据绑定库来实现UI组件与数据模型之间的绑定。这种方法不仅简化了UI逻辑,还提高了代码的可读性和维护性。
3.9 运行效果
